Several years ago, I invested in a cutting machine.
This machine, a Cricut, can cut lots of materials, engrave, fold and draw, but personally I use it mainly for cartonnage with motifs or curves.

This article is therefore intended for those who need a few tips on how to use it for their cartonnage.
Those who have purchased a tutorial with PDF templates will first need to convert them, as Design Space doesn't recognize PDF files.
To do this, you can use ilovepdf.com or convertio.co/en. Convertio not only converts PDFs to jpeg or png, but also to svg if you want to rework them in a vector graphics program. The great thing about these two sites is that they're both free!
Once you've done that, open Design Space.
Open a "New Project" and in the left-hand menu choose "Upload" then "Upload image" and "Browse" to search the converted file in your computer. Once done, select the file and click on "Add to canvas" in the bottom right-hand corner.
This is what appears:
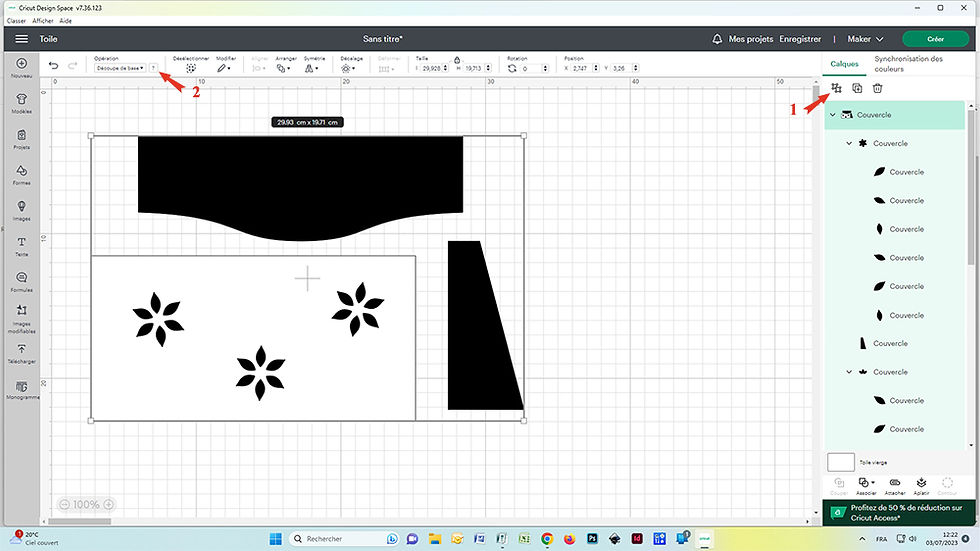
First of all, you'll need to ungroup (1) if you have several designs in the same frame.
As you can see, some designs are black. I'd advise you to make everything white to see if there are any hidden cut-outs. In addition, check that "Cut" is selected (2).
Then, if, as on this model, there are cut-outs inside some of the designs, highlight the design AND its motifs to be cut out and group them (see above 1), to avoid moving one without the other. Finally, reselect each group and "Attach" (3) so that you can cut them together (not the petals on one side and the cardboard on the other).
On my model, I need two triangular sides, so I'll right-click and choose copy then paste. You can also change the direction: "Flip" (4).

Please note that you'll need to check the dimensions of the design against the original, as Design Space tends to resize (click on the design and its dimensions appear) (5). At the top of the page, leave the lock closed and change the size of one of the sides. Thanks to the lock, the other side will resize itself.
If you're using different thicknesses of cardboard for the same project, simply hide the ones you don't want to cut by clicking on the eye beside the selection.

Finally, when everything is ready, click on "Make it".

If you click on one of the parts, 3 dots appear. This allows you to reposition or hide an element.
Then click on "Continue" (after switching on your Cricut of course 😊).
Here are my settings:
2mm cardboard: Chipboard 1.5 mm, knife blade, purple mat (StrongGrip).
Be careful to push the wheels to the right and not to use cardboard over 2 mm and 11 inches, or 27.9 cm. Keep the cardboard on the mat with masking tape on all four sides. 9 passes are usually sufficient.
1mm cardboard: Poster board, fine-point blade, green mat (StandardGrip mat).
Paperboard: Heavy cardstock, fine-point or deep-cut blade, green mat.
If your paperboard has a smoother side, it may be preferable to glue your fabric to this side. In that case, place the smooth side against the mat. You'll then need to cut it in mirror image: see "Symmetry" above. If you choose "Mirror" after clicking on "Make it", the whole mat will be mirrored.
Thin card: light cardstock, fine-point blade, green mat.
I hope you've found this tutorial useful, but please don't hesitate to contact me if anything is unclear. By the way, comments are, I hope, possible again under this article.
And if you'd like to practise, I've made a box to store your tools and blades, the tutorial is now on sale in my store.


